
|
|
||
|
First things first
To start, type !list in the main channel window. This will bring up a list of all the available fserve ads; below is a guide of what to do with each type.
You can also type !list followed by the desired user's nick (e.g. !list Nadja) to get only that person's ad, if you wish. However, please do not do this more than two or three times at once. Any more than that and it is more efficient to type a single !list. Not to mention less bothersome for other people, having to see continuous !lists.
Fileserver
The fileservers, or fserve, is used to browse files in a directory-based format. A fserver sets one directory to run from, and then any file contained within, even in further subdirectories, is available for queuing. Users familiar with DOS will be right at home with fserves.
Ads and triggers
This is the basic fileserver ad:
To access an fserve, all you need to do is type the trigger. An fserve may have more than one trigger; however, they are all contained in the square brackets following the Triggers: part of the ad. If there are multiple triggers, they will be separated by an &. Colours will vary between fserves of course, and most will not have background colours.
Therefore in the above example, there are two triggers: /ctcp Nadja Observe the Viewing Globe /ctcp Nadja Ecto-phase trooper blast within me!
Please note: mIRC doesn't work like a word processor or browser. When you drag-select a block of text, it will automatically be copied to your clipboard, so you don't need to use Ctrl-C. In fact, using the Ctrl key while copying will result in the colour codes from the ad being replicated also. This means that when you paste and press enter, the trigger will simply display to the members of the channel, so don't hold down Ctrl as you copy, or as you press enter after pasting.
The second part of the ad, beginning with Message:, may appear separately from its partnering triggers in the flurry of ads you will receive, or there may not even be one. It is an optional section of the fserve ad which the server can use if he/she wishes, to summarise the contents of the fserve, or sometimes set conditions for using the fserve.
Accessing the fserve
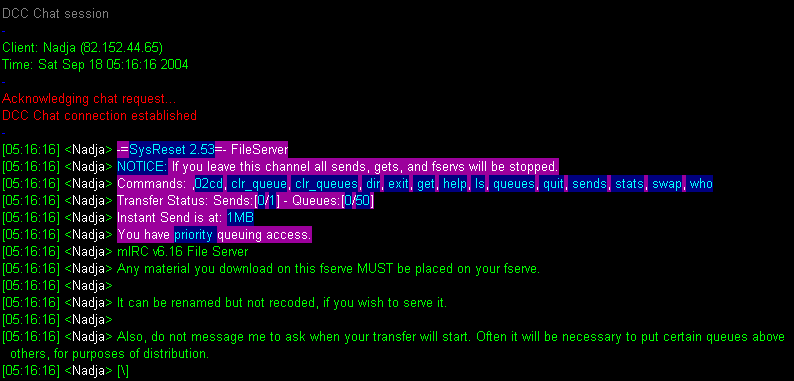
When your fserve window opens, you will see something along these lines:
The three lines beginning Any material you download... and ending with ...for purposes of distribution comprise a welcome message. These are customisable by the server, and most do not bother with them.
Navigating
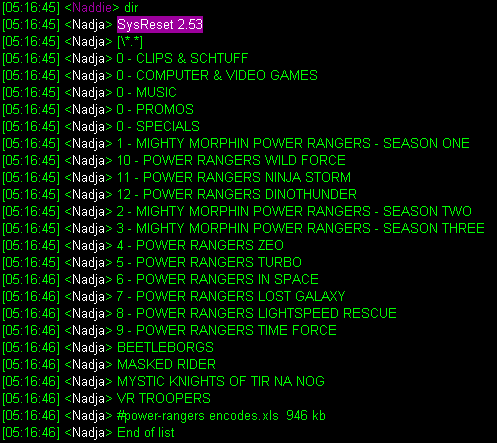
The first thing to do is to type dir, this command provides the contents of the directory you are currently in, as shown in the following diagram. Please note: directory names are always shown completely in uppercase letters, with filenames in lowercase and suffixed with the filesize.
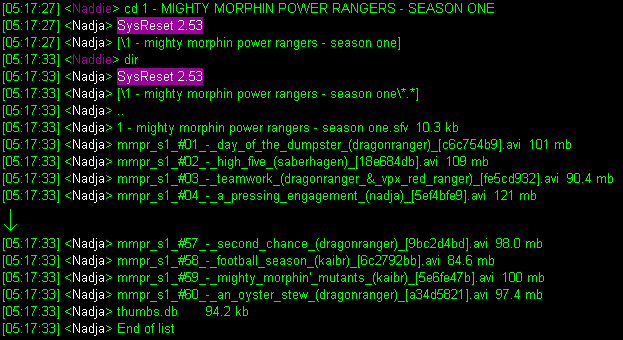
In order to enter a directory, you must type cd followed by the directory name. The following diagram shows the command being used to enter the MMPR Season One directory.
You will notice that the new directory's contents will only appear after you type dir again. This must be typed every time you change directories, in order to see the contents.
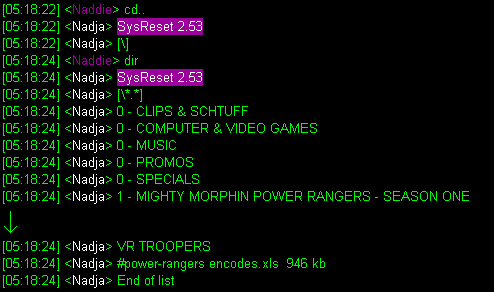
To return to the directory above, simple type the command cd..
This command does not need to be followed by a directory name, and once you are back in the higher directory remember to type dir again.
Queueing a file
When you decide which file you want to queue, you must navigate to its directory to find it, as shown above. Once there, all you need to do is type get, followed by the filename. Make sure not to include the filesize in this. Once you have done this correctly, you will receive confirmation of which queue slot you are in, or if there are no send slots in use, then the file will begin sending immediately.
The below example would be typed in the MMPR Season One folder as shown in the Navigating section above:
Checking or cancelling queues
There are three more commands that you will need to know in order to use an fserve:
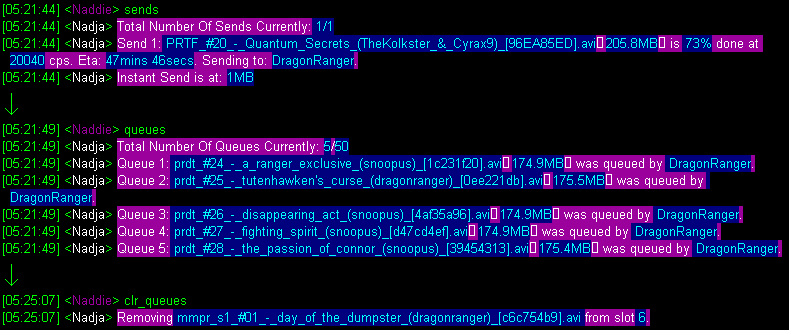
The first is sends. This command shows details of any ongoing transfers, including an estimated time of completion, based on the current transfer speed.
The second is queues. This shows all the existing queues on the fserve, including any of your own.
Please note: Opening an fserve just to check the status of your queues can be quite irritating to a server, especially if repeated continuously. When you queue your file, take note there and then of how fast any current transfers are going, and how many queues there are before your slots comes up. Using this information you can estimate a time as to when you can expect your transfer to begin; you should normally wait until then before checking, although it is preferable to show patience.
The last command is clr_queues. This command will delete all queues that you have on the fserve, opening slots for you to queue something you might want more, perhaps, or for if you've begun receiving the file from another fserve. Do be aware that once you have cleared your queues, subsequent queues will join the end of the queue, not replace the slot you have just cleared (unless you were already at the end of the queue, of course).
TDCC
TDCCs are used to provide a trigger for a single file, as opposed to the entire directory that an fserve allows access to.
This is the basic TDCC ad:
TDCCs are very simple to use. Use the trigger in the same way as an fserve, and you will receive a notice stating that your file is being sent, or if no send slots are available, what queue position your file is in.
There is no way to check the sends and queues of a TDCC in the same way you can with an fserve. The only way to follow the progress of your file in this case is if the provider of the TDCC also runs an fserve, and the TDCC uses the same queue pool, whereby you can check sends and queues as normal on the fserve. Again though, it is irritating for a server to see someone accessing the fserve continuously just to check on the status of their queues, so please exercise patience.
XDCC
XDCCs are funny creatures, essentially a compacted way to run multiple TDCCs, without running a large number of ads. They are mostly used in larger channels; their usefulness is limited in #power-rangers, although some people do run them.
This is the basic XDCC ad:
As you can see, the triggers are located in a different place to an fserve or TDCC ad, but they are still used in the same way. However, using an XDCC trigger results in a further ad-like interface:
What you have here is essentially an array of TDCCs. The syntax for the text command is displayed after Usage:. All you need to do is change <pack number> for the corresponding number of the file you want. Therefore, in this example, if you wanted to download Fighting Spirit (and let's face it, who wouldn't?) then the command would be /ctcp Nadja XDCC GET Latest #4
|
 |