|
First of all, a couple of guidelines to serving:
- When you serve, you agree to become a contributer; this means you are not going to make a poor attempt at serving purely in order to gain voice and download files quicker.
- You must have your server on for a significant portion of the time you spend in the channel. Never turn on your fserve just to gain voice and make a priority queue, and then turn it off. Give people the opportunity to actually be able to download from you.
Getting started:
Visit SysReset's website to download the program (get the full installer, not the upgrade).
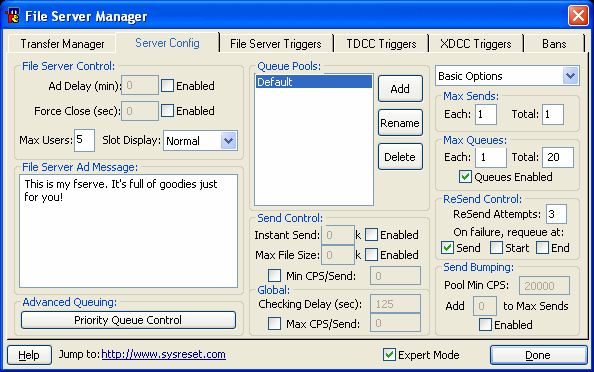
From the top menu, select > , and move to the tab.
Adjust your settings so your window matches diagram 1. If you wish to have a message show up in your fserve ad (i.e. describing the content of your server" then type it into the text-box marked .
Please note: The channel minimum for queue slots is 5, but I suggest you have yours at 10 or 20 anyway. It won't use up any more bandwidth, it just allows more people to be in your list at one time.
Diagram 1:
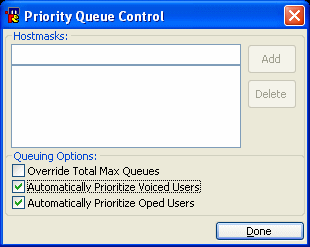
Click on the Priority Queue Control button in the bottom-left to open a new window. Adjust it to match diagram 2, then click Done.
Diagram 2:
Move to the tab, and click on Add. Enter the text for your trigger.
Please note: This is the text that will appear after the "/ctcp " part of the trigger. Try to avoid generic ones like simply "Power Rangers". And keep off "Observe the Viewing Globe" too - that's mine! :p
You'll be offered the chance to set up a welcome file. If you want to do this, create a text file on your hard drive containing the message you want to appear when someone accesses your server, then select the text file in this window.
Please note: You probably won't need a welcome message, at least to begin with, but if you want one, keep it as short and relevant as possible.
The next window will ask you which folder you want to serve from (be aware that all subfolders will also be served). VERY IMPORTANT: do not select the folder that you download files to. Serving incomplete files is not allowed in this channel, so move all the complete files you wish to serve to a separate folder, and select that folder from this window.
Click OK to go back to the File Server Manager. Make sure to click on your trigger from the list on the left (otherwise the options you select next won't apply to it).
Make sure that the tickboxes for , and are all ticked, as shown in diagram 3. For now, leave the Access mode pull-down box on "No Restrictions".
Diagram 3:
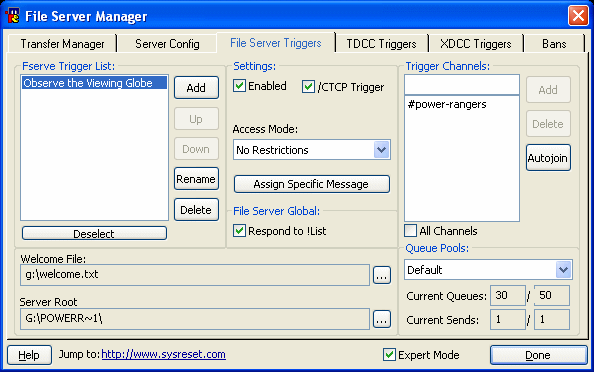
In the Trigger Channels section, untick the box labelled . Into the text-box above, type and the click the Add button to the right.
Your File Server Triggers tab should now resemble diagram 3, with the appropriate substitutions. Click Done to close the File Server Manager.
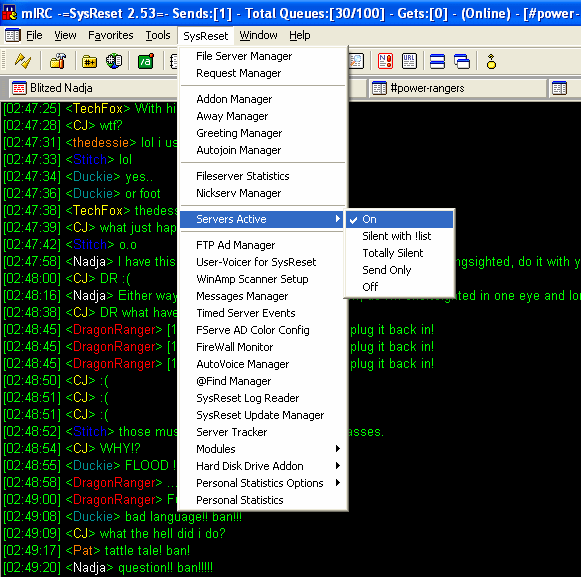
Again from the top menu, ensure that > is set to , as shown in diagram 4.
Diagram 4:
The basic fserve is now set up. Be sure to ask an op to check it at this point.
That should be everything, you're now a server! You can now voice yourself by typing !voiceme, or your server will be picked up automatically by one of the operator's autolists.
Please note: If you need to disable your server at all, by selecting > > , then type !devoiceme.
|